Monday, July 27, 2009

How to Create an (8.5 x 11) 3 Panel Roll Fold Brochure


Good Morning,
Hope everyone is doing well today. Today I am going to tell you how to set up a 3 panel roll fold brochure (8.5 x 11). In printing, to make a brochure fold correctly, you must make 2 of the panel the same size (3.6875) the last panel will be slightly shorter (3.625) that way the brochure will have a shorter fold into the brochure.

Sometimes you have to take into consideration the paper thickness, etc. Here is an example of a roll fold document from Indesign:


Basically the purpose is to have the last panel that folds in is supposed to be shorter so that it will fold correctly leaving the front even with the back panel. Hope this helps with creating a roll fold brochure. The same would apply to a bigger size brochure also. Remember two panels are the same size and the last panel is slightly smaller, or shorter. Have a great Day!

Wednesday, July 22, 2009

How to Create a Mask of Textured Background in Illustrator
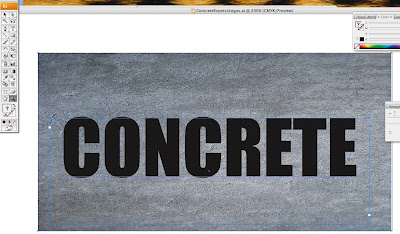
Hello!

Today I will show you how to create text with a textured background image, so that the type looks like it is made out of the image. The example I am using is a photo of concrete. I will make a mask of the concrete and use it for the text.

•Open Illustrator first, set up an 8 x 4 document just for my example that is what I am using.
•Click the File Tab : Place (find image to use for the background)
It is okay if the image is too big for the document as long as it is not a huge file size.
Type the words you want to use for your mask, I made the type Black,
place over the background image.

•Select all by the pressing the command key and A key at the same time.
•Now go to the Object Tab: Select Clipping Mask: Make


Cool hu? Now you have a simple way to make type look like concrete that was the background image.

Monday, July 20, 2009

Customer Service at Clinton Press

Good Morning!
Today I would like to talk about the economy and printing. I have been in printing for 16 years now (wow I am getting old, LOL). I have noticed a change in the printing business over the years. Especially with the new technology and websites, etc.

It seems that several companies are going paperless or putting newsletters, magazines, information, and more on their websites. So therefore that means less printing is required, then they will also save money, right? How many folks out there will still want the hard copy of the newsletter and magazines? I guess it is a personal choice.

I read blogs, newsletter and websites all the time. But I still like to have the paper items to read in my hands, it is easier for me to read. I have never in my life seen the economy the way it is today. Some people think eventually we will not have printed pieces but I do not see that happening so much in the near future.

Now is the time, many printing companies are offering different types of services to go along with the printing needs.... marketing, training services, mailing, etc. It seems the future will require much more than just putting ink on paper. Customers are looking for full service from the beginning to the end of their jobs.

That is what we do here at Clinton Press, not only do you get customer service, marketing, printing, mailing, training, etc. We do it all and we are local so you can see your proof and make decisions ahead of time. We want our customers to feel at home. Stop by sometime and introduce yourself. Being the Prepress Manager I rarely get to see the faces behind the emails or phone calls.

Any questions or ideas you have we would be glad to address. I am always willing to help designers, buyers, marketing managers, and ad agencies. We are a full service printing company and want to help in every aspect possible. Drop by today or call for a free quote!
Have a great day! Nikki

Friday, July 17, 2009

At Clinton Press we have this great promotion going on this summer for one of those really cool Flip Camcorders! Order today and be entered to win!

I don't think I can enter, but it would be cool to win it!


SPECIAL SUMMER PROMOTION!

PLACE AN ORDER BY AUG 31 - WIN A FREE FLIP CAMCORDER!

At Clinton Press, we understand the importance of creating unique marketing strategies. As your trusted communication experts, we can help you combine innovation & technology to ensure your business remains unique among the competition! Need marketing ideas that fit your budget and your revenue goals? We can help! Place an order by August 31 to be entered into a drawing for a Flip Video Camcorder! PLACE YOUR ORDER TODAY!

Tuesday, July 14, 2009

Creating a Pantone Spot Color Gradient in Illustrator

Start a new document in Illustrator. For an example I am going to draw a circle in the middle of the page. Next go to Window: Swatch Libraries: Color Books: Pantone Solid Coated. Next pick the pantone spot color you would like to use. I chose Pantone Purple C.


Next choose Window: Gradient, now the Gradient palette comes up. Since I have selected pantone purple and it shows in my swatches palette. I will drag the purple to the black side of the gradient palette as shown below:


Now you have a Pantone gradient and you can select Radial to change the shape of the gradient.


Now you have a circle gradient. Hope this helps understand how to create a pantone spot gradient in Illustrator! Have a great week!

Friday, July 10, 2009

Using PMS colors in Indesign

T.G.I.F.
Almost the weekend! Today I am going to show you how to use the pms colors in Indesign.
First set your document up, go the the windows tab at top and scroll to swatches. This will bring the swatches palette up in your document.

CLICK THE SMALL ARROW DROP DOWN MENU AND CHOOSE NEW COLOR SWATCH:
NEXT CHANGE COLOR TYPE TO SPOT AND COLOR MODE TO PANTONE SOLID COATED OR UNCOATED, WHATEVER YOU PREFER, SHOULD LOOK LIKE THE IMAGE BELOW:

NOW CHOOSE THE PMS COLOR AND CLICK ADD:
VOILA, NOW YOU HAVE THE PMS COLOR IN THE PALLET TO USE IN YOUR LAYOUT DESIGN AS SHOWN BELOW!
HAVE A GREAT WEEKEND!


Wednesday, July 8, 2009

Tifs, EPS, JPEGs, PDFs, oh my, which format to use....

TIF - Tagged Image File Format

TIFF or the Tagged Image File Format is a rather old standard that is still very popular today. It is a highly flexible and platform-independent format which is supported by numerous image processing applications and virtually all all prepress software on the market. TIFF is strictly used for bitmap data. It doesn’t contain text nor vector data, even though its structure would permit additional tags to handle such data. Flexible combination of colorspace, bitdepth/datatype, and compression scheme


EPS - Encapsulated Postscript File Format
An EPS file can contain any combination of text, graphics and images. Since it is actually a PostScript file, it is the most versatile file format that is available. EPS-files usually contain a small preview image that is used to visualize the content of the file.

JPEG - Encapsulated Postscript File Format
JPEG stands for Joint Photographic Experts Group, which is a standardization committee. It also stands for the compression algorithm that was invented by this committee. JPEG is a lossy compression algorithm that has been conceived to reduce the file size of natural, photographic-like true-color images as much as possible without affecting the quality of the image as experienced by the human sensory engine. We perceive small changes in brightness more readily than we do small changes in color. It is this aspect of our perception that JPEG compression exploits in an effort to reduce the file size.

PDF - Encapsulated Postscript File Format
PDF stands for Portable Document Format. In prepress, PDF is commonly used as a format to exchange data, either complete pages that need to be printed or advertisements that needs to be included in a publication. The file format is also popular for softproofing and reviewing content, because there are applications that allow you to make annotations on the PDF pages.

Okay now you have all the definitions, it is really up to the customer to discuss each file format with the
printer to make sure they support the file format sent in. I prefer the customer send the PDF for print ready
collateral that they have already proof-read and pretty much know the file is print ready.

If it is a illustrator or freehand file, it is best to save as an eps for the printer, that way they can open it in many prepress programs. Tifs are great for photos in photoshop or placing in a layout program like Indesign, quark. I do not like JPEG, usually they are compressed but either way our ripping software does not like them very much. When I get these types of links I open in photoshop and convert to eps or tif and resave.

All in all, you should talk to your printer to educate yourself and them about the best file format to send it in. This will save time, money and headaches.

Happy Wednesday!

Tuesday, July 7, 2009

Did you know you can edit some pdfs in Illustrator?

Sometimes, if you are lucky and need to make a correction to color or even font corrections, you can do this in Illustrator. I have found sometimes if it is something simple like a color change, this is the best way to do it.

When you open the pdf in illustrator, it may ask for font replacement. This is bad if you do not have the fonts that are in the pdf file. At that point you may need to call the customer. If you have the fonts it may work, but be sure to print a laser of the customer's pdf, in case of reflow within the paragraphs.

You could be even luckier and the fonts may already be converted to outlines. Then the fonts are treated as artwork. But in prepress you never know what you may end up with. I have used Illustrator many times to correct something quickly. That way everything can continue running smoothly and there will not be any hold up time printing for a client.

I have found working in prepress that there are many ways to work around problems. I will try everything I can figure out or know before contacting customers. Then I can contact the customers and educate them. I think that our clients like to know what they can do to help the speed up the printing of their collateral. At Clinton Press we offer this service to help educate customers on fixing the files before sending to us on the next go around. This helps to save money and time.

Have a Great Day!

Monday, July 6, 2009

How To Create A Feathered Edge on Photos


Happy Monday All,

You know the cool feathered edges you see sometime on photos? They are usually rounded or rounded edges. Today I am going to tell you how to create one. It is just a neat design trick and you don't have to worry about the transparencies in indesign.

Open your image you wish to add the feathered edge to. Select the box marquee tool to the left.
Draw a box inside the image, as shown in photo.


Now go to the Select Tab at top and choose Inverse: Then Select: Modify: Feather, a box will appear with the pixels, I put in 10 in the box. Then press delete. Perfect now you have a feathered edge on your photo: as seen below


Hope this helps with making feathered edges on your favorite photos. Have a great week. Nikki


Wednesday, July 1, 2009

DID YOU KNOW THAT YOU CAN EDIT IMAGES IN SOME PDFS

Hello everyone!

It's almost July 4th, amazing how time flies when you get older! Happy July 4th a few days earlier! Today I am going to explain how to edit photos or images that are embedded in a PDF.

I know you are not supposed to be able to change anything in a pdf, but sometimes you can and sometimes you have no choice in pre-press but to work around what you have been given by a customer. So desperate measures have to be taken, so if you have Acrobat 8 professional, or version 7, and I think this will even work in 6 on a Macintosh.

Open your PDF in Acrobat: At the top click on the TOOLS tab: scroll down to ADVANCED EDITING: Choose TOUCH UP OBJECT TOOL at the bottom.

Next hold down the Apple key (Command key) and the Option key at the same time and double click the object, link, or photo you would like to modify. This will take the image to photoshop or illustrator which ever program it was originally created. You can edit your image and just save.

When you save the image it will automatically put the edited image back into the pdf document. Then you can re-save the pdf. It is a great tool if it works with the pdf sent.

This is not always possible it just depends on the pdf, how it was saved, etc.
Try it out sometime, it is a really awesome tool, I use it often.

Have a Happy and Safe July 4th!
Nikki